


We already know that you’re using Ceros to create captivating interactive content for your audience. For many of you, that audience is looking increasingly diverse as your organization’s reach extends beyond borders and languages. In order to reach the greatest number of people, you need to localize your content.
In this article, we’re going to cover everything you need to know to produce a localized Ceros experience. To help us out, we’ve partnered with Transifex, a leading localization platform.
Want to learn more about localization? Read this blog post!
What you need to get started
A completed Ceros experience
A Transifex account
SDK access enabled for your Ceros account (only for custom language pickers)
If you aren’t already a Transifex customer, sign up for a 30-day free trial with the link here and let your Ceros account manager know that you’re interested in localization!
Getting Started
Step 1: Create a new Transifex project
Log into your Transifex account and click Create new project.
Set the project type as Live.
Choose the experience’s source languages and the ones you want to translate into.
Click Create Project.
Under What can I do now?, type https://view.ceros.com (or your vanity URL if you’re using one) into the text box and click Create Resource.
In the top right corner, click the three dots and then Settings.
In the Staging domain field, enter the domain of your preview links (https://account-name.preview.ceros.com). If you aren’t sure, open up an experience in Studio and click Preview.
Note the Live API Key for the next step.
Click Save Settings.
Step 2: Add the Transifex plugin to your Ceros experience
In Studio, open up the experience that you want to translate.
Click Settings.
While you're in the Settings panel, click on the Performance tab and make sure your experience is set to Component mode.
Next, while still in the Settings panel, click the Custom HTML tab
Paste the following code in:
<script>
window.liveSettings = {
api_key: "TRANSIFEX_TOKEN",
dynamic: true,
detectlang: true
};

require.config({
paths: {
"CerosSDK": "https://sdk.ceros.com/standalone-player-sdk-v5.min",
"Transifex": "https://cdn.transifex.com/live",
"cerosTransifexPlugin": "https://creative-services.ceros.com/ceros/transifex-plugin/2-latest/ceros-transifex-plugin.min"
},
});

require(["CerosSDK", "Transifex", "cerosTransifexPlugin"], function (CerosSDK, Transifex, cerosTransifexPlugin) {
cerosTransifexPlugin.init(CerosSDK, window.Transifex)
});
</script>
In line 3 of the code you just pasted, replace
INSERT_TRANSIFEX_LIVE_API_KEY_HEREwith the API key from the previous step.In line 5 of the code, you’ll find the
detectlangoption. This can have multiple settings:true- the page will be displayed in the user’s language if available (based on browser/OS language), otherwise the source languagefalse- the page will always be displayed in the source language firstfunction() { return 'LANG'}- the page will always be displayed first in the language specified. Replace LANG with the desired language code.
Click OK.
Step 3: Mark Strings that should be translated
In Studio, click Preview.
Click on the address bar and add ?Transifex to the end of the URL. It should look something like this: https://account-name.preview.ceros.com/my-experience/page/page-123?Transifex.
The Transifex sidebar should open. Click Log in and use your Transifex credentials.
Click through all of the different parts of the experience to let Transifex discover all of the text. Make sure to scroll to the bottom of each page and if there are pop-ups, make sure to click through those as well.
Once you’re done, click Manage Strings. Scroll through the list and click the checkbox next to any text that should be translated. If you aren’t sure, don’t select it (you can always select it later).
Click Approve.
Close the Manage Strings box and quickly scroll through the experience again. All of the text boxes should now appear green. If you see any that are still in blue, go back to Manage Strings and make sure you got them all.
Step 4: Translate the strings
In the Transifex resource page for https://view.ceros.com, click the blue arrow and then Translate in Editor.
Translate the text using your methodology of choice. If you have any questions about this process, contact your Transifex account executive. For demonstration purposes, you can select all of the words and click Machine Translate to get a rough idea of what the experience can look like.
Step 5: See what the translations look like in the experience
Go back to the Preview window and reload the page. If the Transifex sidebar doesn’t appear, add ?Transifex to the end of the URL.
In the Transifex sidebar, click the languages dropdown and select one of the languages that’s been translated. The text should change.
Observe any areas in the design that appear broken in a different language (text overflowing to a new line, extending too far into another part of the experience).
In the Studio, adjust the size of the relevant textboxes, font size, etc. The results should be reflected immediately in the Preview window.
Step 6: Publish translations
Click Publish in the Transifex sidebar.
Click the Production tab and repeat the previous step.
Publish the Ceros Studio experience.
Embedding the experience
To embed a localized experience in your website, you’ll need to slightly modify the embed code to show each language ID.
NOTE: It's critical that the language ID for each language is identical to the ID/code used in Transifex or it will not function correctly.
For example, here’s the relevant part of the embed code that you get from the Studio publish dialog box:
<iframe allowfullscreen src='//view.ceros.com/internal-ryan-hefner/together-demo-2?heightOverride=3412&mobileHeightOverride=7373' To force this embed to display in Spanish, add &lang=es to the end of the URL. All other parts of the code should remain the same. Here’s what it should look like:
<iframe allowfullscreen src='//view.ceros.com/internal-ryan-hefner/together-demo-2?heightOverride=3412&mobileHeightOverride=7373&lang=es'Note on Syntax:
If your embed URL already includes query parameters (anything after a ?, like heightOverride), you should append the language parameter with an ampersand (&lang=es).If your URL does not already include any parameters, you must begin the query string with a question mark (?lang=es). For example:
<iframe allowfullscreen src='
//view.ceros.com/internal-ryan-hefner/together-demo-2?lang=es'>
Using the wrong symbol (like starting with & on a clean URL) will prevent the translation from working correctly, so it’s important to structure the URL properly.
Create a language picker
If your experience is embedded in a website that’s already localized, it probably doesn’t need a language picker (see above for embed instructions). If you need a picker, you have two options - use the basic language picker provided by Transifex or create one from scratch with native Ceros Studio components.
Enable the basic Transifex language picker
In the Transifex sidebar, click Settings and under Language picker position, choose a location.
Click Save.
Create a language picker using Ceros Studio components
In the Transifex sidebar, click Settings and under Language picker position, and either choose a location (for Transifex’s picker) or Do not place a picker (for a custom picker).
Click Save.
Switch to the Production tab and repeat.
Click Log out and then click the X to close the sidebar completely.
If you’re using the Transifex language picker, stop here.
In Studio, create a language picker in any way you desire (contact your Ceros account executive if you’d like to see some examples). The only requirement is that there will be a separate hotspot per language variant.
Open the SDKPanel.
For each language variant hotspot, add the tag language-select and set the payload to the language code from Transifex. For example, the code for English is en and for Spanish is es. Also, click the Active cursor on hover checkbox.
Create language-specific images
Ceros experiences often contain components that are language-specific. For example, you might have an image that contains text that needs to be displayed in the correct language.
Create all language versions of the component and drag them into Studio as layers.
Create the folder structure seen in this image (parent folder → language-specific subfolders → language-specific content).
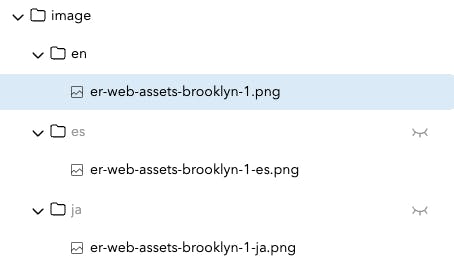
Open the Ceros SDK tab. Click the parent folder (
imagein the example above) and enter the taglanguage-swap.Click each language-specific subfolder (
en,es, andjain the example above) and enter the language code as the payload (againen,es, andjarespectively).Open the Ceros preview and switch between languages to make sure that everything looks right.